(网站 , Website)OpenCVUncategorized

OpenCV3.X不再支持PDF文档

信息来源 http://answers.opencv.org/question/66989/why-did-opencv-3-change-its-documentation-tool-from-sphinx-to-doxygen/

大家可以加我的微信公众号(nui-develop)回复“opencv html”将会免费得到最新的opencv的html文档~

或者用积分在csnd下载 http://download.csdn.net/detail/guoming0000/9771687


Why did the OpenCV team decide to change its documentation tool from sphinx to doxygen? I like the sphinx generated documentation and thought OpenCV 2 had both nice online and printed documentation that was relatively easy to author. I have searched but have not seen a discussion of why change to doxygen.

I asked this same question on StackOverflow, but it was closed as being off-topic. I am hoping to get some insight from this forum.

Thanks!


Main advandages:

  • with doxygen it is easier to maintain documentation and to support contrib modules
  • reference is always consistent with the code (for example, it can not contain function which have been deleted)
  • generator has some built-in correctness checks (for example, if some function have several documented parameters and several undocumented, then generator will produce a warning)

Main disadvantages:

  • no pdf documentation yet (doxygen supports this output, but it needs some tuning)
  • no java/python documentation yet (doxygen can produce xml, but some cooperation with javadoc/pydoc/epydoc is needed)
  • basic search is limited to entity identifiers only, i.e class/method/namespace/tutorial names (Google custom search can be used for full-text search)

Additional advantages:

  • doxygen can produce help in some additional formats: rtf, chm (Compiled HTML), qch (Qt help), Eclipse help, XCode DocSets. However, all these methods should be additionally configured and tuned
  • basic search works without web server (one can build and use html reference on local machine)
  • formula rendering uses MathJax client-side technology
  • html documentation can be built really fast comparing to sphinx (1 min vs. 31 min)
OpenCVUncategorized

OpenCV3.2发布了

感觉opencv回到intel后,没干啥新的东西。。。停滞不前了

这次提供的尽然只有vc14版本的编译版本,不用vs2015的编译器还用不了opencv3.2了~上一个310还有vc12的,唉~

http://opencv.org/opencv-3-2.html

2016-12-23

Dear OpenCV users!

1 year after 3.1 release and after the OpenCV core team has moved back to Intel we are pleased to announce OpenCV 3.2 release, with tons of improvements and bug fixes. 969 patches have been merged and 478 issues (bugs & feature requests) have been closed.

Big thanks to everyone who participated! If you contributed something but your name is missing, please, let us know.

Merry Christmas and Happy New Year!

Changes

The detailed list of changes since 3.1 can be found at https://github.com/opencv/opencv/wiki/ChangeLog. Here is the short summary:

Results from 11 GSoC 2016 projects have been submitted to the library:

  • Ambroise Moreau (Delia Passalacqua) – sinusoidal patterns for structured light and phase unwrapping module
  • Alexander Bokov (Maksim Shabunin) – DIS optical flow (excellent dense optical flow algorithm that is both significantly better and significantly faster than Farneback’s algorithm – our baseline), and learning-based color constancy algorithms implementation
  • Tyan Vladimir (Antonella Cascitelli) – CNN based tracking algorithm (GOTURN)
  • Vladislav Samsonov (Ethan Rublee) – PCAFlow and Global Patch Collider algorithms implementation
  • João Cartucho (Vincent Rabaud) – Multi-language OpenCV Tutorials in Python, C++ and Java
  • Jiri Horner (Bo Li) – New camera model and parallel processing for stitching pipeline
  • Vitaliy Lyudvichenko (Anatoly Baksheev) – Optimizations and improvements of dnn module
  • Iric Wu (Vadim Pisarevsky) – Base64 and JSON support for file storage. Use names like “myfilestorage.xml?base64” when writing file storage to store big chunks of numerical data in base64-encoded form.
  • Edgar Riba (Manuele Tamburrano, Stefano Fabri) – tiny_dnn improvements and integration
  • Yida Wang (Manuele Tamburrano, Stefano Fabri) – Quantization and semantic saliency detection with tiny_dnn
  • Anguelos Nicolaou (Lluis Gomez) – Word-spotting CNN based algorithm

Big thanks to all the participants!

There have been many contributions besides GSoC:

  • Greatly improved and accelerated dnn module in opencv_contrib:
    • Many new layers, including deconvolution, LSTM etc.
    • Support for semantic segmentation and SSD networks with samples.
    • TensorFlow importer + sample that runs Inception net by Google.
  • More image formats and camera backends supported
  • Interactive camera calibration app
  • Multiple algorithms implemented in opencv_contrib
  • Supported latest OSes, including Ubuntu 16.04 LTS and OSX 10.12
  • Lot’s of optimizations for IA and ARM archs using parallelism, vector instructions and new OpenCL kernels.
  • OpenCV now can use vendor-provided OpenVX and LAPACK/BLAS (including Intel MKL, Apple’s Accelerate, OpenBLAS and Atlas) for acceleration

Download

The latest version can be downloaded from SourceForge and GitHub:
Windows self-extracting archive: sourceforge
iOS framework: sourceforge
Android SDK: sourceforge
The source code for all platforms can be downloaded from GitHub: zip and tar.gz

OpenCVUncategorized

OpenCV3.X在VC++下的配置(OpenCV3.X视频配置教程)

录制了一下OpenCV3.X在VS2015下的配置视频,目前编译好的OpenCV只有X64的库,32bit的库需要自己编译。本教程适用于操作系统Win7、Win8、Win8.1、Win10里配置OpenCV3.X在Visual Studio2013、Visual Studio2015上进行C++的配置。如想了解更多的OpenCV配置知识可以参见以前的视频:[OpenCV配置]OpenCV在Win7 Win8 VS2010 VS2012下的配置(附文档+视频 吐血之作)

http://v.qq.com/iframe/player.html?vid=v0303pejy3f&tiny=0&auto=0

OpenCVUncategorized

Aruco Marker Detect标记检测

想了解背后算法可以参考文章,或者阅读源码,我在这里只是调用下函数接口,对算法不了解。

加个关键字:KinectV2和AR结合,OpenCV AR SDK

http://v.qq.com/iframe/player.html?vid=j0302wnmrxv&tiny=0&auto=0
以下是代码,注意你得有aruco的库,木有的话要去下载才行。

// ArucoVideoCapture.cpp : 定义控制台应用程序的入口点。
//

#include "stdafx.h"
#include "opencv-include/opencv2/aruco.hpp"
#include "opencv-include/opencv2/opencv.hpp"
#include <iostream>

using namespace std;
using namespace cv;


int main(int argc, char *argv[]) {
	VideoCapture inputVideo;
	int waitTime;
	inputVideo.open(0);
	inputVideo.set(CAP_PROP_FRAME_WIDTH, 1280);
	inputVideo.set(CAP_PROP_FRAME_HEIGHT, 720);
	waitTime = 10;

	double totalTime = 0;
	int totalIterations = 0;

	Ptr<aruco::Dictionary> dictionary = aruco::getPredefinedDictionary(aruco::DICT_ARUCO_ORIGINAL);
	Mat out;
	dictionary->drawMarker(100, 600, out, 5);

	Ptr<aruco::DetectorParameters> detectorParams = aruco::DetectorParameters::create();
	detectorParams->minDistanceToBorder = 0;

	while (inputVideo.grab()) {
		Mat image, imageCopy;
		inputVideo.retrieve(image);
		double tick = (double)getTickCount();
		vector< int > ids;
		vector< vector< Point2f > > corners, rejected;
		vector< Vec3d > rvecs, tvecs;
		// detect markers and estimate pose
		aruco::detectMarkers(image, dictionary, corners, ids, detectorParams, rejected);

		double currentTime = ((double)getTickCount() - tick) / getTickFrequency();
		totalTime += currentTime;
		totalIterations++;
		// draw results
		image.copyTo(imageCopy);
		if (ids.size() > 0)
		{
			aruco::drawDetectedMarkers(imageCopy, corners, ids);
			if (totalIterations % 30 == 0) {
				cout << "Detection Time = " << currentTime * 1000 << " ms "
					<< "(Mean = " << 1000 * totalTime / double(totalIterations) << " ms)" << endl;
			}
		}

		imshow("out", imageCopy);
		char key = (char)waitKey(waitTime);
		if (key == 27) break;
	}

	return 0;
}


OpenCVUncategorized

【转】使用OpenCV进行斑点检测Blob Detection Using OpenCV ( Python, C++ )

要做个检测圆的程序,除了传统hough方法,还以用这个blob检测算法,听别人说这个算法就是检测“一坨东西”用的。不得不说最后一个图真好,我再opencv官方文档都找不到这么好的图,也没有什么教程,唯有这篇文章如此详细告诉我怎么用。特别要注意,默认检测黑色点,如果要检测白色的点请设置bycolor为true,并且color数值是255.

下段文字内容参考自:http://doc.okbase.net/ronny/archive/102540.html

斑点通常是指与周围有着颜色和灰度差别的区域。在实际地图中,往往存在着大量这样的斑点,如一颗树是一个斑点,一块草地是一个斑点,一栋房子也可以是一个斑点。由于斑点代表的是一个区域,相比单纯的角点,它的稳定性要好,抗噪声能力要强,所以它在图像配准上扮演了很重要的角色。

同时有时图像中的斑点也是我们关心的区域,比如在医学与生物领域,我们需要从一些X光照片或细胞显微照片中提取一些具有特殊意义的斑点的位置或数量。

比如下图中天空的飞机、向日葵的花盘、X线断层图像中的两个斑点。

还有一篇文章介绍背后的算法,blob特征检测原理与实现 abcd1992719g


OpenCV Blob Detection Example
This tutorial explains simple blob detection using OpenCV.

What is a Blob ?

A Blob is a group of connected pixels in an image that share some common property ( E.g grayscale value ). In the image above, the dark connected regions are blobs, and the goal of blob detection is to identify and mark these regions.

SimpleBlobDetector Example

OpenCV provides a convenient way to detect blobs and filter them based on different characteristics. Let’s start with the simplest example

Python

1
2
3
4
5
6
7
8
9
10
11
12
13
14
15
16
17
18
19
20
# Standard imports
import cv2
import numpy as np;
# Read image
im = cv2.imread("blob.jpg", cv2.IMREAD_GRAYSCALE)
# Set up the detector with default parameters.
detector = cv2.SimpleBlobDetector()
# Detect blobs.
keypoints = detector.detect(im)
# Draw detected blobs as red circles.
# cv2.DRAW_MATCHES_FLAGS_DRAW_RICH_KEYPOINTS ensures the size of the circle corresponds to the size of blob
im_with_keypoints = cv2.drawKeypoints(im, keypoints, np.array([]), (0,0,255), cv2.DRAW_MATCHES_FLAGS_DRAW_RICH_KEYPOINTS)
# Show keypoints
cv2.imshow("Keypoints", im_with_keypoints)
cv2.waitKey(0)

C++

1
2
3
4
5
6
7
8
9
10
11
12
13
14
15
16
17
18
19
using namespace cv;
// Read image
Mat im = imread( "blob.jpg", IMREAD_GRAYSCALE );
// Set up the detector with default parameters.
SimpleBlobDetector detector;
// Detect blobs.
std::vector<KeyPoint> keypoints;
detector.detect( im, keypoints);
// Draw detected blobs as red circles.
// DrawMatchesFlags::DRAW_RICH_KEYPOINTS flag ensures the size of the circle corresponds to the size of blob
Mat im_with_keypoints;
drawKeypoints( im, keypoints, im_with_keypoints, Scalar(0,0,255), DrawMatchesFlags::DRAW_RICH_KEYPOINTS );
// Show blobs
imshow("keypoints", im_with_keypoints );
waitKey(0);

How does Blob detection work ?

SimpleBlobDetector, as the name implies, is based on a rather simple algorithm described below. The algorithm is controlled by parameters ( shown in bold below )  and has the following steps. Scroll down to know how the parameters are set.

  1. Thresholding : Convert the source images to several binary images by thresholding the source image with thresholds starting at minThreshold. These thresholds are incremented  by thresholdStep until maxThreshold. So the first threshold is minThreshold, the second is minThreshold thresholdStep, the third is minThreshold + 2 x thresholdStep, and so on.
  2. Grouping : In each binary image,  connected white pixels are grouped together.  Let’s call these binary blobs.
  3. Merging  : The centers of the binary blobs in the binary images are computed, and  blobs located closer than minDistBetweenBlobs are merged.
  4. Center & Radius Calculation :  The centers and radii of the new merged blobs are computed and returned.

Filtering Blobs by Color, Size and Shape

The parameters for SimpleBlobDetector can be set to filter the type of blobs we want.

  • By Color : [ Note : This feature appears to be broken. I checked the code, and it appears to have a logical error ]  First you need to set filterByColor = 1. Set blobColor = 0 to select darker blobs, and blobColor = 255 for lighter blobs. 
  • By Size :   You can filter the blobs based on size by setting the parametersfilterByArea = 1, and appropriate values for minArea  and maxArea. E.g.  setting minArea  = 100 will filter out all the blobs that have less then 100 pixels.
  • By Shape : Now shape has three different parameters.
    1. Circularity :  This just measures how close to a circle the blob is. E.g. a regular hexagon has higher circularity than say a square. To filter by circularity, set filterByCircularity = 1.  Then set appropriate values forminCircularity and maxCircularity.  Circularity is defined as (frac{4*pi*Area}{perimeter * perimeter}
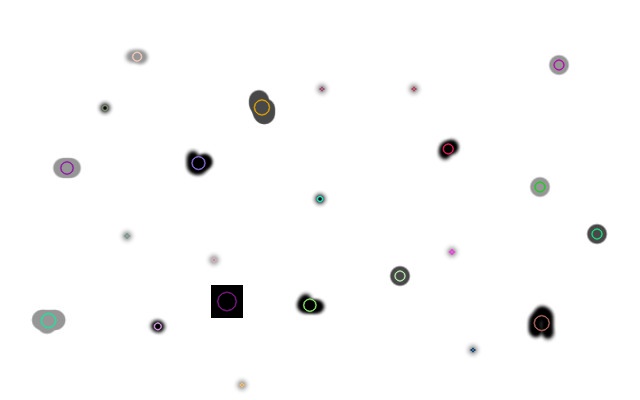
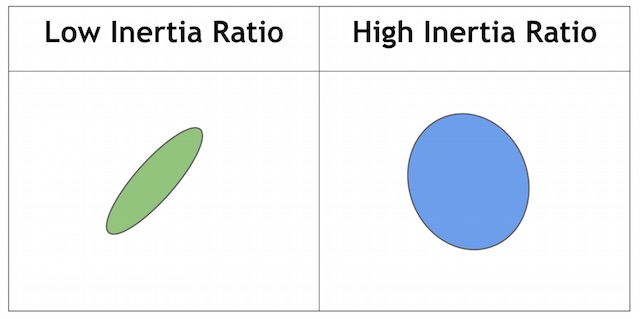
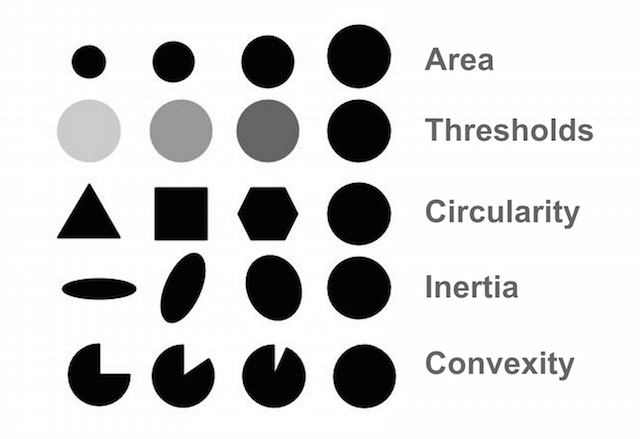
). This means that a circle has a circularity of 1, circularity of a square is 0.785, and so on.
    2. Convexity : A picture is worth a thousand words.  Convexity is defined as the (Area of the Blob / Area of it’s convex hull). Now, Convex Hull of a shape is the tightest convex shape that completely encloses the shape.  To filter by convexity, set filterByConvexity = 1, followed by setting 0 ≤ minConvexity≤ 1 and maxConvexity ( ≤ 1) Concave versus Convex Shape
    3. Inertia Ratio : Don’t let this scare you. Mathematicians often use confusing words to describe something very simple. All you have to know is that this measures how elongated a shape is. E.g. for a circle, this value is 1, for an ellipse it is between 0 and 1, and for a line it is 0. To filter by inertia ratio, set filterByInertia = 1and set 0 ≤ minInertiaRatio ≤ 1 and maxInertiaRatio (≤ 1 ) appropriately. Inertia Ratio

How to set SimpleBlobDetector params ?

Setting parameters for SimpleBlobDetector is easy. Here is an example

Python

1
2
3
4
5
6
7
8
9
10
11
12
13
14
15
16
17
18
19
20
21
22
23
24
25
26
27
28
29
# Setup SimpleBlobDetector parameters.
params = cv2.SimpleBlobDetector_Params()
# Change thresholds
params.minThreshold = 10;
params.maxThreshold = 200;
# Filter by Area.
params.filterByArea = True
params.minArea = 1500
# Filter by Circularity
params.filterByCircularity = True
params.minCircularity = 0.1
# Filter by Convexity
params.filterByConvexity = True
params.minConvexity = 0.87
# Filter by Inertia
params.filterByInertia = True
params.minInertiaRatio = 0.01
# Create a detector with the parameters
ver = (cv2.__version__).split('.')
if int(ver[0]) < 3 :
    detector = cv2.SimpleBlobDetector(params)
else :
    detector = cv2.SimpleBlobDetector_create(params)

C++

Setting of params for SimpleBlobDetector in OpenCV 2 is slightly different from OpenCV 3. In the code below we use the macro CV_MAJOR_VERSION to detect the version of OpenCV. In OpenCV 3, the SimpleBlobDetector::create method is used to create a smart pointer. The usage is shown in the code below.

1
2
3
4
5
6
7
8
9
10
11
12
13
14
15
16
17
18
19
20
21
22
23
24
25
26
27
28
29
30
31
32
33
34
35
36
37
38
39
40
41
// Setup SimpleBlobDetector parameters.
SimpleBlobDetector::Params params;
// Change thresholds
params.minThreshold = 10;
params.maxThreshold = 200;
// Filter by Area.
params.filterByArea = true;
params.minArea = 1500;
// Filter by Circularity
params.filterByCircularity = true;
params.minCircularity = 0.1;
// Filter by Convexity
params.filterByConvexity = true;
params.minConvexity = 0.87;
// Filter by Inertia
params.filterByInertia = true;
params.minInertiaRatio = 0.01;
#if CV_MAJOR_VERSION < 3   // If you are using OpenCV 2
  // Set up detector with params
  SimpleBlobDetector detector(params);
  // You can use the detector this way
  // detector.detect( im, keypoints);
#else
  // Set up detector with params
  Ptr<SimpleBlobDetector> detector = SimpleBlobDetector::create(params);
  // SimpleBlobDetector::create creates a smart pointer.
  // So you need to use arrow ( ->) instead of dot ( . )
  // detector->detect( im, keypoints);
#endif

Download code & example image

If you liked this article and would like to get more OpenCV tips, tricks, examples and tutorials in your email, sign up using the blue top bar. Some of my material is exclusive for email subscribers. My emails are meant for beginners and intermediate level OpenCV programmers who want to learn more.

Click OpenCV blob detector to download code (C++, Python, and example image) from GitHub. The image included in the download link can be used to test various parameters, as shown below.

Test Area, thresholds, circularity, inertia, and convexity

OpenCVUncategorized

[转]CVPR 2015 OpenCV 3.0 tutorial!

原文转自这里。文章提供了很多opencv官方的文档,阅读可以知晓opencv3.0具体结构和改变~~

CVPR 2015 OpenCV 3.0 tutorial!

1. Description:

We will overview the new OpenCV 3.0 Release — What’s changed, what’s improved, what’s added. We will then step you through hands-on with a series of exercises from simple to complex. All coding will be done via local connection to a server. You only need a browser.

2.  Tutorial

1)  OpenCV 3.0 overview, architecture,

【下载】OpenCV3_CVPR_2015.pptx

OpenCV Tutorial CVPR 2015-0

       2)  Speed session — OpenCV HAL, T-API (OpenCL), performance tips & tricks:

        【下载】OpenCV3_CVPR_2015_Speed


OpenCV Tutorial CVPR 2015-3OpenCV Tutorial CVPR 2015-4

        3)    OpenCV modules — The cool stuff you likely don’t know about

【下载】 OpenCV3_CVPR_2015_Modules

OpenCV Tutorial CVPR 2015-2

3.Presenters

        Dr. Gary Rost BradskiVadim Pisarevsky 、Vincent Rabaud 、Grace Vesom


详细内容参考:http://code.opencv.org/projects/opencv/wiki/OpenCV_Tutorial_CVPR_2015

KinectOpenCVUncategorized

使用OpenCV显示KinectV2数据

这次给大家分享下我自己写的KinectV2的OpenCV项目,可以用于研究KinectV2图像算法的人。项目地址在我的Github页面。另外还有更复杂的OpenCV显示KinectV2人脸追踪的项目,适用于研究人脸追踪Face Tracking、人脸识别Face Recognition、人脸特征点提取Face Alignment,就不提供源码了,有需要请去我的淘宝店询问后购买。

相对于我以前给出的OpenCV程序,这个程序的好处是不用配置OpenCV环境,直接可以编译运行。不了解如何做到这点的同学,可以下载学习下这种配置方法。欢迎,留言或分享你的代码。

程序适用人群

  • 学术研究、图像处理算法研究者

程序功能:

  • 使用OpenCV显示KinectV2数据

开发环境:

  • win32控制台应用程序 x86程序 (程序类型)
  • VisualStudio 2013 (开发工具)
  • KinectSDK-v2.0-PublicPreview1409-Setup (Kinect SDK驱动版本, http://brightguo.com/kinect2)
  • Windows 8.1 (操作系统)
  • OpenCV2.4.10

继续阅读

知识链接OpenCVUncategorized

OpenCV官方学习文档

推荐书籍:《OpenCV入门教程》 于仕琪老师撰写

OpenCV配置以及视频

http://brightguo.com/opencv-config

永恒最新地址(目前离线文档更新到了OpenCV 2.4.13)

各版本OpenCV下载地址

离线文档(PDF)

参考手册Reference Manual

教程 Tutorials

用户手册 User Guide

C++备忘 C++ Cheatsheet

在线文档

参考手册 Reference Manual

用户指南 User Guide

教程 Tutorials

Java API

各种语言例子代码

其它OpenCV学习书本

(1)使用OpenCV开发机器视觉项目Mastering OpenCV with Practical Computer Vision Projects

书本PDF下载

完整项目源代码下载

我写的中文介绍

OpenCV官网介绍

(2)OpenCV 2 Computer Vision Application Programming Cookbook

书本PDF下载

(3)Learning OpenCV computer vision with the OpenCV library

书本PDF下载

(4)OpenCV算法实现参考文献(25个pdf)

zip下载

OpenCV For IOS


OpenCV For Android

opencv for android 教程(环境搭建篇)


知识链接OpenCVUncategorized

[OpenCV配置]OpenCV2.X在Win7 Win8 VS2010 VS2012下的配置(附文档+视频 吐血之作)

如想了解如何配置OpenCV3.X,请点我跳转到最新的配置视频

[视频内容开始][优酷视频放在最后]

优酷视频链接稍后给出,先给出SkyDrive上的视频共享地址https://skydrive.live.com/redir?resid=76E4F6E8AB62619!105,下载这个比较小,并且十分清楚。

背景介绍

概述

OpenCV(Open Source Computer Vision)在BSD开源协议(介绍)下发布,可以研究也可以被商用。它有C++,C,Python和Java的函数接口。支持Windows、Linux、Mac OS、iOS和Android操作系统。OpenCV具有高效的计算效率,专注于实时程序应用设计。在优化过的C/C++语言下,OpenCV可以充分利用多核处理器的性能。在全世界,超过47万人使用,600万次下载。不论是互动艺术、矿山监察、地图拼接或者机器人应用,都可以看到OpenCV的踪影。

配置过程

准备步骤

明确自己的电脑配置

对计算机右键–>选择属性,查看自己电脑的配置。看到“系统类型”,告诉我们电脑是32位(x86)构架的,还是64位(x64)构架的?

确认自己所安装软件开发平台。

即确认IDE(Integrated Development Environment,集成开发环境)是什么版本,是Visual Studio 2010还是VS2012?[什么版本不重要,本教程使用2012做例子,其它版本类似,都可以找到相应的选项]

下载OpenCV

在网站http://opencv.org/右侧,点击OpenCV for Windows下载。

具体配置

解压缩

把OpenCV-2.X.X解压并放到某个目录下,例如 D:OpenCV 。(我的是在F:SoftsOpenCV245下面,记住这个地址,下面要用)

配置系统环境变量

对计算机右击–>属性–>高级系统设置–>高级–>环境变量

如果没有这个Path变量,就自己添加一个,我的路径是:

F:SoftsOpenCV245opencvbuildx86vc11bin

VS2008选择VC9,VS2010选择VC10,VS2012选择VC11

X86还是x64,随意选择

注意,添加完毕后需要注销再重新登入此用户

创建Win32控制台应用程序或者Win32项目(必须建一个)

点击完成

打开属性页管理器

视图–>属性页管理器–>选下方的“属性管理器”。(VS2010中可以在“其它窗口”中找到)

展开OpenCV_Win32,看到Microsoft.Cpp.Win32.user,对它右键选择属性,选择VC++目录。

配置include和lib路径

include即告诉VC去什么地方寻找OpenCV的头文件。

然后对VC++目录下选项进行添加:

(1)Library Directories(库目录)

F:SoftsOpenCV245openvbuildx86vc11lib

(2)Include Directories(包含目录)

F:SoftsOpenCV245opencvbuildincludeopencv

F:SoftsOpenCV245opencvbuildincludeopencv2

F:SoftsOpenCV245opencvbuildinclude

添加链接库(初学者全部添加,熟悉后根据所需要的模块添加)

opencv_core245d.lib

opencv_imgproc245d.lib

opencv_highgui245d.lib

opencv_ml245d.lib

opencv_video245d.lib

opencv_features2d245d.lib

opencv_calib3d245d.lib

opencv_contrib245d.lib

opencv_legacy245d.lib

opencv_flann245d.lib

opencv_gpu245d.lib

运行一个简单的例子(许多网站都有代码,视频中会有详细演示)

打开lena.tiff,如果成功打开,说明opencv配置成功!

其它注意

我们创建的是Win32程序,不论是32位电脑还是64位电脑,配置方法都一样,都可以使用这种x86配置方法。


配置路径地址有很多方法,比如在MFC中,我们无法唤出“属性页管理器”,可以使用普通方法配置。


Release的配置

和Debug一致,只是lib库名字最后没有那个d英文字符。


高级版本的OpenCV都是支持低级版本的,一般情况下越新的越好。


发布程序时,把dll一并发布,如果是debug程序还需要包含IDE环境的dll,可以百度问下放在电脑哪个文件夹。(有时还缺少提示其它dll文件,最好在没有vs2010和opencv的电脑上测试成功后再发布给别人)[本人暂时不会使用staticlib编译成不需要dll的程序,如果有会的人,欢迎写教程告知]


安装部分结束

如果有任何错误请向我提出,我会将错误在文档中进行更正。(截止2013-9-4没人留言呢)

[视频结束]


额外拓展(有相对应的视频)

进阶

更佳的环境变量OPENCV_DIR

配置环境变量也有很多方法,比如我们可以设置一个名字叫OPENCV_DIR的变量给出OpenCV的build文件夹所在路径。这样在OpenCV版本变换时,我们只需要修改这个环境变量即可。

根据需要添加lib

参见word文档

OpenCV路径个文件夹的作用

bulid文件夹是最重要的,其它文件夹删除不会影响opencv的运行。

特别注意samples下的例子如何运行

全部在项目的属性里配置

不去“属性页管理器”配置,直接在项目的属性页里配置,这样每个OpenCV项目都需要配置一次。

Image Watch插件

OpenCV调试必备,前提:使用VS2012。OpenCV.org上可以下载到。—->演示一下

Visual Assist X

可以在百度云下载。

官方学习文档汇总

http://brightguo.com/opencv

或者

http://blog.csdn.net/guoming0000/article/details/8839055

学习网站

英文官网 : http://opencv.org/

中文官网 : http://www.opencv.org.cn

QQ群

Opencv机器视觉图像处理  168464304    116/500人

计算机视觉(一)   130541036       217/500人

图像学技术       77351873          650/1000人

CvChina计算机视觉论坛       133654392   244/500人

参考

http://www.opencv.org.cn/index.php/VC_2010_Express%E4%B8%8B%E5%AE%89%E8%A3%85OpenCV2.4.3

http://www.opencv.org.cn/forum/viewtopic.php?f=1&t=14545

http://u.youku.com/此人无情   他做了一系列opencv(c语言接口+windows)的视频教程。

附录

官方学习文档

OpenCV2.4.5  2013-4-23更新

OpenCV for Windows
OpenCV for Linux/Mac
OpenCV for Android
OpenCV for iOS

1.离线文档(PDF)

参考手册Reference Manual

教程 Tutorials

用户手册 User Guide

C++备忘 C++ Cheatsheet

2.在线文档

参考手册 Reference Manual

用户指南 User Guide

教程 Tutorials

Java API

各种语言例子代码

3.其它OpenCV学习书本

(1)使用OpenCV开发机器视觉项目Mastering OpenCV with Practical Computer Vision Projects

书本PDF下载

完整项目源代码下载

我写的中文介绍

OpenCV官网介绍

(2)OpenCV 2 Computer Vision Application Programming Cookbook

书本PDF下载

(3)Learning OpenCV computer vision with the OpenCV library

书本PDF下载

(4)OpenCV算法实现参考文献(25个pdf)

zip下载

后话

两年前,我因为本科毕设有幸接触到OpenCV,之后读研仍然进行图像方面的研究。由于OpenCV的运算高效性,许多大学和公司借助它进行算法开发。遇到最多的问题就是配置问题,每年总是有许多人询问。制作此文以及视频,是节省更多的人的时间,尤其是那些已经不厌其烦帮助一个又一个菜鸟成功配置OpenCV的好人们~

视频

OpenCV配置 Win7 Win8 VS2010 VS2012


http://player.youku.com/embed/XNTU4NTM2MDAw

OpenCV简单了解

http://player.youku.com/embed/XNTU4NTI1OTA4